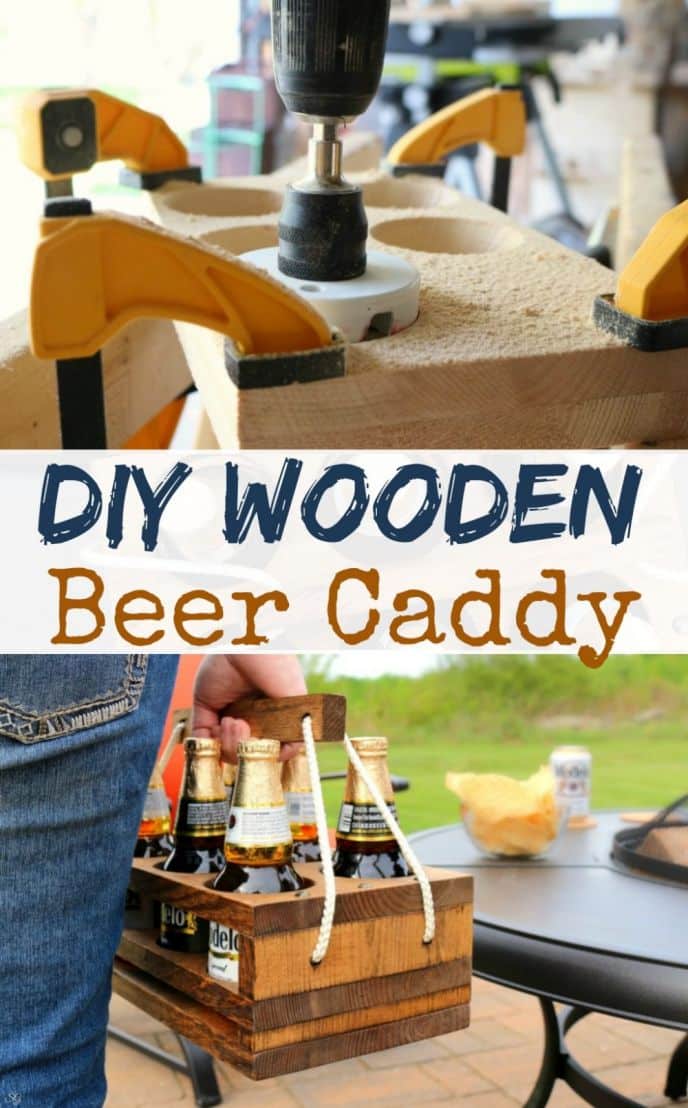
Beer caddy – the greatest DIY project you can make this year! These DIY wooden beer caddy plans are easy to follow, and it’s a stylish way to transport your beer. This shop has been compensated by Collective Bias, Inc. and Constellation Brands. All opinions are mine alone. 21+. #SummertimeCerveza #CollectiveBias
Let’s build a DIY beer caddy! While I was at the store the other day walking through the beer cooler aisle, I had the brilliant idea to make a six pack beer caddy!
We’ll use it to truck beer down to the patio for when we want to relax or kick the soccer ball around the backyard while enjoying the nice summer weather!
This is a fun project and is a lot of fun to build. It’s great for hanging out on the patio, or showcasing your work in the man cave.
What better way to spread cheer than with a DIY beer tote. You can build this for Father’s Day, a Christmas gift, or a just because gift for your friend who loves a cold brewski!

On my way home I swung by the lumber yard to grab a piece of wood. Somehow I knew that I didn’t already have a 1″ x 8″ board in my lumber stash – strange!
Anyway, this beer holder is pretty easy to build, so let’s get to it!
Tools Needed
DIY Beer Caddy Materials
- Lumber – One: 1″ x 8″ x 6′
- 220 grit sandpaper
- Wood glue
- 1¼ brads (if you have a brad nailer) or finish nails
- Stain
- Rope
- 6 decorative upholstery tacks
For this project, you will need a 3″ hole saw bit that fits onto your drill.
Side Note: What is the actual size of a 1×8? Well, the 1″ x 8″ measurement refers to the rough cut board from the sawmill, not the finish cut size you’ll get at the lumber yard. Your board will actually be ¾” x 7¼” – but everyone refers to them as 1×8’s so that’s what I mean when I say 8″ — the full width of the board.
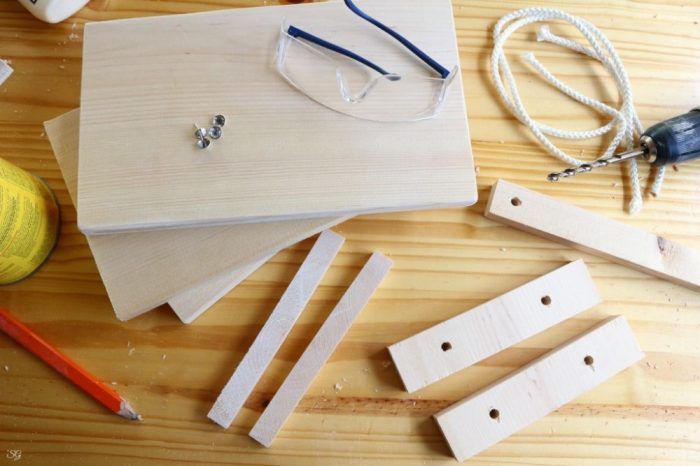
Wood List Cuts
- Three 12½” x 8″ pieces
- Two 1″ x 8″ pieces
- Two 1½” x 8″ pieces
- Drill holes for the rope handle 2″ from either end as seen in the photo above.
- One 9″ x 1¼”
- Drill holes for the rope handle 1″ from either end as seen in the photo above.
Cut the DIY Beer Caddy Holes

Now we need to cut six holes where the beer will be held.
Measurements and Drilling Holes
- This will give you 6 intersections that will mark the center of each 3″ hole.
- Draw a light pencil line 2″ in from either edge on the long side, the entire length.
- Measure 6¼” in from either short side and draw a line across the width.
- Measure 2″ from the center width line towards the ends of the boards, drawing two more lines across the width.
This will give you 6 intersections that will mark the center of each 3″ hole.

You can draw lines for each board. Or do as I did and draw lines on one board, then securely clamp the boards together.
I then clamped the boards to my sawhorses to cut all the holes at once.
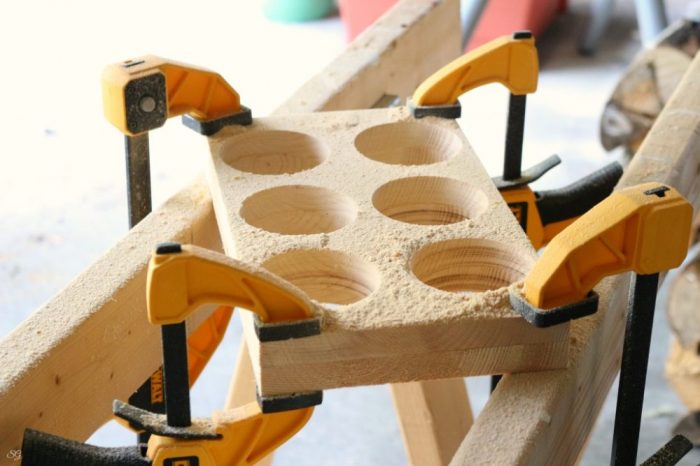
Use the proper personal protective equipment and always keep both hands on your drill when using a hole saw! Don’t ever grip the board while using a hole saw, PLEASE! The thought of catching a finger gives me the shivers!
Assemble The Caddy
Now that we have all of our pieces cut to size and the holes cut out, we’re ready to dry-fit everything together, sand it, stain it, and assemble the beer caddy!

Use 220 grit sandpaper and sand every piece, removing any rough spots and pencil lines.
Wipe clean with a cloth and then apply your wood stain of choice.

The color wood stain I used is called provincial.
Once your piece is stained, the longest part begins. Waiting for the stain to dry. Depending on the weather and what type of stain you use, this can be several hours or even overnight. Let it dry, don’t rush it.
Now that the stain has had the chance to dry, we can begin assembly!
Glue & Nail It Together
Perhaps the best part, assembling the beer holder. This is where it all takes shape!
Attach your 1″ pieces to the solid 12½” board, with the end grain facing up, using wood glue and brads or finish nails.

Using wood glue and nails, attach your first 6 pack ring board.

Tip: Save the nicest board for the top. If you have a chip-out from cutting the holes, ugly knots or any imperfections in one of the 6 pack boards, use that one on this first level – face the imperfections down and they’ll never be seen!
Next, add the 1½ inch pieces, also end grain up at either end of the caddy. Apply your wood glue liberally to the end grain and clamp in place.
Once clamped in place, drive nails in at a 45-degree angle to secure the boards together. Allow the wood glue to dry – most have a 30-minute dry time.
If you wish, countersink the nails so you can disguise the nail holes with color match putty.

Once the wood glue has dried, we can attach the top 6 pack board.

Glue and nail once again.
But wait! When you nail the top board on, use three nails along the edge. One in the center and two in line with the 6 pack holes. Look closely at the photo below. You’ll see why in a minute…

Positioning those three nails carefully was to help set us up for our decorative upholstery tacks.
We’ll install the decorative tacks just next to these nails, so the tack heads conceal the nail heads!
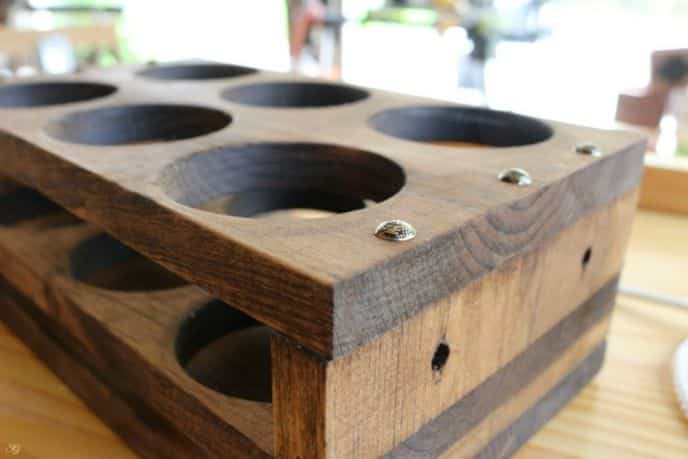
Looks nice, yes?
You can also flip it over and add decorative tacks to the bottom of the caddy to hold it up off the table a bit – not necessary, but a nice addition.
Install The DIY Beer Caddy Handle
If you have giant meat-hooks like me, this next part is a little tricky. It’s time to feed the rope through the holes and tie knots for it to stay in place.
Tips:
- To feed the rope through the holes easier, wrap the end of the rope in a piece of tape. It’ll glide right through!
- Cut your rope extra long so you have plenty to work with! Just trim off the excess when you’re done.
- I cut two pieces of rope to 36″ each, tied them off and snipped off the excess.
Feed the rope through the handle and then feed each end of the rope through the holes on either end of the caddy.
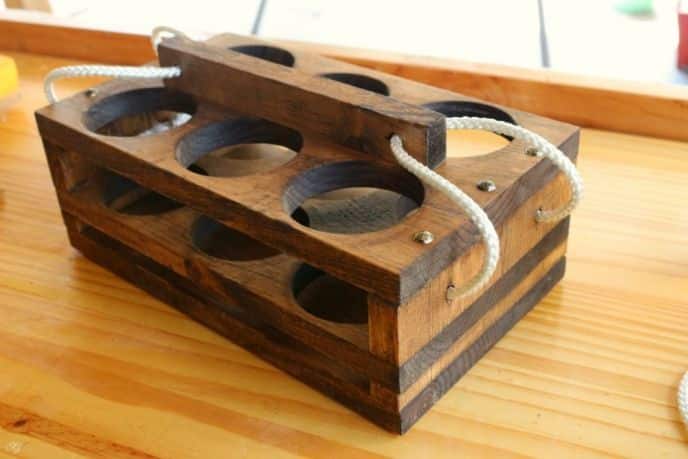
Tie the rope together inside the holder, or tie knots at the end of the rope so they don’t slip back through the holes. Either way works fine!
I tied mine together and put a dab of glue on it so it’ll never come untied. Then I cut off the extra rope.
Make sure you check the length of the rope so you know it is a comfortable handle height before tying tightly.

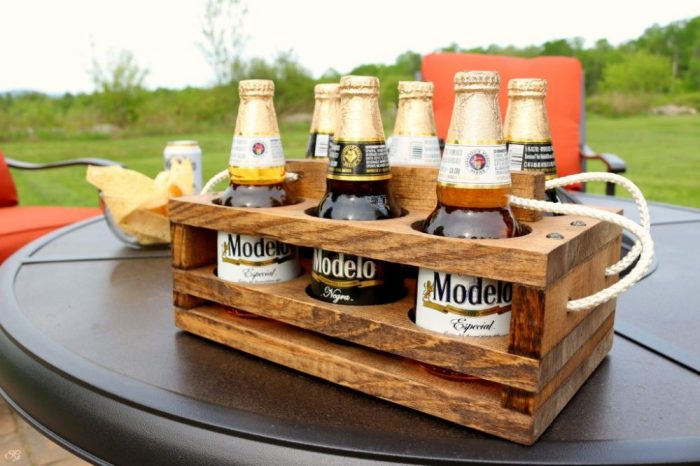
Finished Beer Caddy
Let’s double check once again that our beer bottles will sit in there nicely…
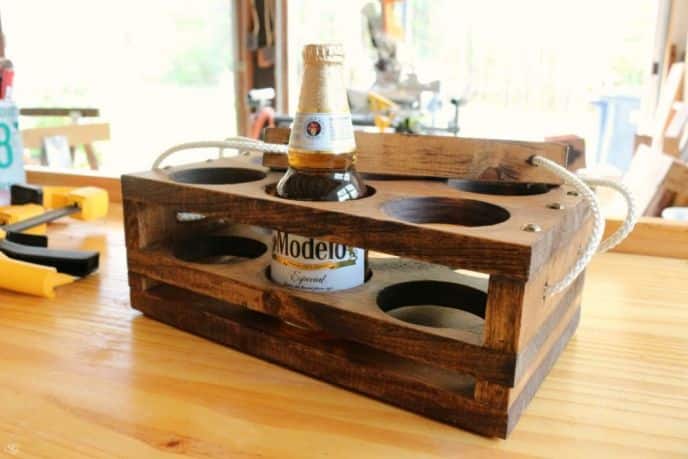
Yup! Pretty sweet DIY beer caddy we have here!
Now we can truck beers down to the patio — no problemo!
PS: A big thank you and shout out to Katie for being my butt model. Cheers! 😉

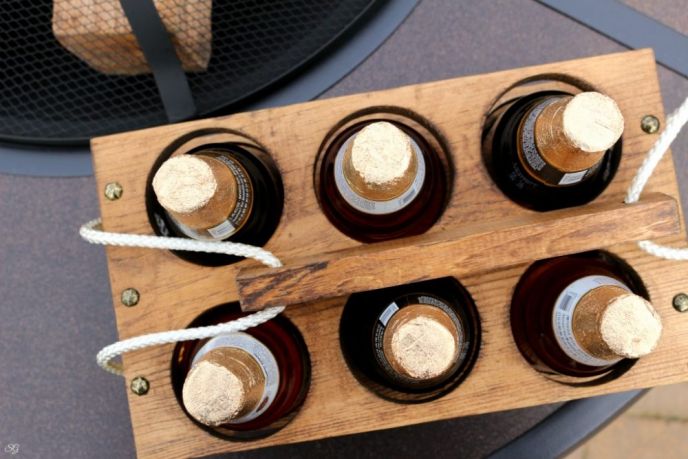
Now, all we have left to do is kick back on the patio and enjoy it!
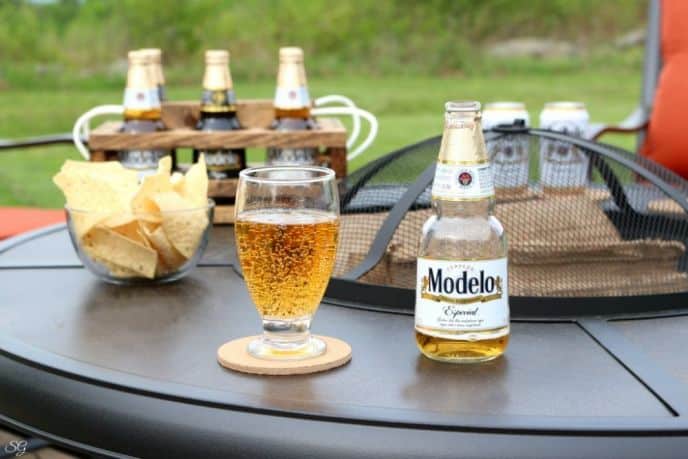
So next time you’re out shopping, grab a few 12 packs of Modelo Especial, Modelo Negra and a piece of wood.
Go ahead, make yourself a nice beer caddy. You deserve it!
Of course, and I know I don’t need to tell you this – don’t drink and build. Save the beer for relaxing!
Pin it for later and grab the instructions below.


Beer Caddy – DIY Wood Beer Holder
Equipment
- Drill
- 3" hole saw bit + bit set
- Hammer or nail gun
- Tape measure
- Foam brush and rag
Ingredients
- 1 piece 1" x 8" x 6' lumber
- 1 piece 220 grit sand paper
- 1 wood glue Titebond III is always a great choice
- 1 box 1-1/4" nails Finish nails or nails for your nail gun or brad nailer
- 1 can stain of your choice I used provincial color.
- 1 piece 64" long rope cut in half
- 6 pieces Decorative upholstery tacks
Instructions
Cut The Wood
- Three 12½” x 8″ pieces for the bottom, middle and top of the beer holder. This will give you 6 intersections that will mark the center of each 3″ hole. Measure and draw a light pencil line 2″ in from either edge on the long side, the entire length. Measure 6¼” in from either short side and draw a line across the width. Measure 2″ from the center width line towards the ends of the boards, drawing two more lines across the width. This will give you 6 intersections that will mark the center of each 3″ hole.Cut each hole out with your 3" hole saw bit.
- Two 1″ x 8″ pieces for the lower side panels.
- Two 1″ x 8″ pieces for the lower side panels.
- Two 1½” x 8″ pieces for the side panels. Drill holes for the rope handle 2″ from either end as seen in the photos.
- One 9″ x 1¼” for the handle. Drill holes for the rope handle 1″ from either end as seen in the photos.
Sand and Stain
- Use your sandpaper to clean up any rough edges.
- Stain the beer caddy with your color choice. Allow stain to dry completely; follow the instructions on the can.
Assembly
- Attach the 1" pieces, end grain up, to the face of the solid 12.5" board at either end with glue and nails
- Glue and nail the first 12.5" board with holes in it on top of the 1" pieces
- Glue and nail the 1.5" pieces end grain up at either end of the caddy, on top of the first six pack ring board. Predrilling holes may be a good idea if you're using finish nails. Clamping the piece will also help here.
- Place the final piece with holes in it on top, gluing and nailing that into place. Secure with nails at three points evenly across the wood. Conceal the nails with furniture tacks
- Cut the rope into two 36" pieces. Pull the rope through either end of the handle. Slide the end of the ropes inside the end panel holes and tie in a knot to secure. Measure and double check that you're leaving the right amount for either side, there will be an excess rope to cut off.
- Enjoy your beer caddy!
Video
Notes
You might also like
Beer Bottle Craft Ideas
Bud Light Lime BBQ Sauce on Grilled Ribs
Follow along for more great flavor!
- Like
- Digg
- Del
- Tumblr
- VKontakte
- Buffer
- Love
- Odnoklassniki
- Meneame
- Blogger
- Amazon
- Yahoo Mail
- Gmail
- AOL
- Newsvine
- HackerNews
- Evernote
- MySpace
- Mail.ru
- Viadeo
- Line
- Comments
- Yummly
- Send in Text
- Viber
- Telegram
- Subscribe
- Skype
- Messenger
- Kakao
- LiveJournal
- Yammer
- Edgar
- Fintel
- Mix
- Instapaper
- Copy Link
Very cool! Great gift idea too. Around here you must have a cooler handy, with 100°+ temps, that beer would warm up fast!