DIY Fall pumpkin decor is in full swing and it’s time to make your own DIY fall suncatchers shaped like pumpkins! Gather the kids, they’re real easy to do.
With summer wrapping up, the leaves changing, harvest season moving right in, we’re all thinking fall food, fall colors, and fall home decorations, right?
Try these Wood Halloween Jack O Lanterns as another easy weekend pumpkin decor project!

Fall Pumpkin Decor
Fall pumpkin decor is a must. Whether it’s carving real pumpkin jack o’ lanterns, or creating decorations from scratch to use year after year.
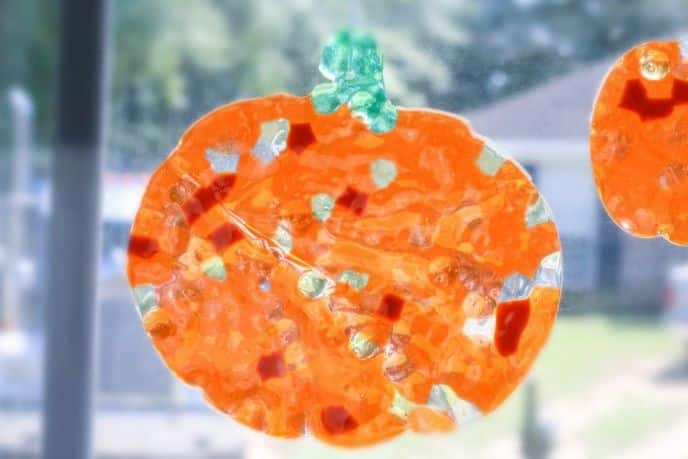
For this project, we’re making pumpkin suncatchers from scratch.
DIY Fall Suncatchers
There are many different ways to make suncatchers. Today, we’re using plastic beads to make this a little more kid friendly.
Adult supervision is required, but the kids can certainly get in on making these fun DIY fall suncatchers!
DIY Suncatchers with Beads
To make bead suncatchers, start with your materials.
- Plastic translucent pony beads
- Baking sheet
- Aluminum foil
- Metal pumpkin cookie cutters
- Cordless Drill and small drill bit
Once you have the materials gathered, it’s time to make DIY suncatchers with beads!

How To Make DIY Suncatchers with Beads
Making bead suncatchers are quite simple to do. Follow these instructions and you’ll have fun fall decor to spread throughout your house.
Place them on the window sills or drill holes so they can be hung in the windows, too!
Arrange The Beads
First, preheat the oven to 400 degrees F.
Next, line a baking sheet with aluminum foil. Then, place cookie cutters on the aluminum foil.
Fill each cookie cutter with a single layer of beads.

Tip: Using a toothpick makes arranging the beads into a single layer easier!
Melt The Beads
Next, place the baking sheet in the oven.
Note: Be aware that the beads do release plastic smells/fumes as they melt. To avoid the smell, you can use a toaster oven outside.

Allow the beads to melt in the oven for 5 to 15 minutes, checking every few minutes.
Depending on the type of bead, they may take a shorter or longer period of time to melt.
Our beads took 15 minutes to melt.
Cool The Pumpkin Suncatchers
Next, once the beads are melted, remove them from the oven and allow them to cool completely on the cookie sheet.

After they’ve cooled, remove them from the cookie cutters by gently pull the sides of the cookie-cutter away from the plastic.
Drill A Hanging Hole
Drill a small hole in the top of the suncatcher for hanging.
Then, use a scrap piece of wood to set the pumpkin on while you drill the hole. Doing so will prevent you from ruining a good surface.

Hang your fall suncatchers in the window in your living room, above your kitchen sink, or where ever you’d like!

PS: You can also hang these on your Christmas tree, too!
Related Projects

DIY Suncatchers Pumpkin Decor
Equipment
- Cookie Cutters
- Aluminum foil
- Drill
Ingredients
- Plastic translucent pony beads
- Baking sheet
- Aluminum foil
- Metal pumpkin cookie cutters
- Drill fitted with a small drill bit
Instructions
- Preheat oven to 400 degrees F., line a baking sheet with aluminum foil.
- Place cookie cutters on the aluminum foil and fill each cookie cutter with a single layer of beads.
- Place the baking sheet in the oven.Please Note: Be aware that the beads do release plastic smells/fumes as they melt. To avoid the smell, you can use a toaster oven outside.Allow the beads to melt in the oven for 5 to 15 minutes, checking every few minutes. Depending on the type of bead, they may take a shorter or longer period of time to melt. Our beads took 15 minutes to melt.
- Once the beads are melted, remove them from the oven and allow them to cool completely on the cookie sheet. After they've cooled, remove them from the cookie cutters by gently pull the sides of the cookie-cutter away from the plastic.
- Drill a small hole in the top of the suncatcher for hanging if desired.
Notes
- Like
- Digg
- Del
- Tumblr
- VKontakte
- Buffer
- Love
- Odnoklassniki
- Meneame
- Blogger
- Amazon
- Yahoo Mail
- Gmail
- AOL
- Newsvine
- HackerNews
- Evernote
- MySpace
- Mail.ru
- Viadeo
- Line
- Comments
- Yummly
- Send in Text
- Viber
- Telegram
- Subscribe
- Skype
- Messenger
- Kakao
- LiveJournal
- Yammer
- Edgar
- Fintel
- Mix
- Instapaper
- Copy Link
An easy and fun fall decor project to work on over the weekend!